How to make Pendrive bottable?
To make a pen drive bootable means setting it up so that it can start a computer when it’s plugged in. It’s like giving the pen drive the ability to act as a mini-computer all by itself. This is handy for installing new software, fixing problems, or running special tools without needing to use the computer’s main hard drive.
To make a pen drive bootable means setting it up so that it can start a computer when it’s plugged in. It’s like giving the pen drive the ability to act as a mini-computer all by itself. This is handy for installing new software, fixing problems, or running special tools without needing to use the computer’s main hard drive.

Why do we make Pendrive bootable
We make a Pen drive bootable (a bootable device is like a key that unlocks the door to your computer’s operating system, allowing it to start up and run)so that we can use it to start up a computer and run operating systems or utilities directly from the pen drive, without needing to install anything on the computer’s hard drive.
To Make a Pendrive bootable, you need a few key requirements
- USB Pendrive
- ISO Image
- Computer with USB Port
- Bootable USB Creation Tool
- Internet Connection (Optional)
Methods
- Rufus
- CMD
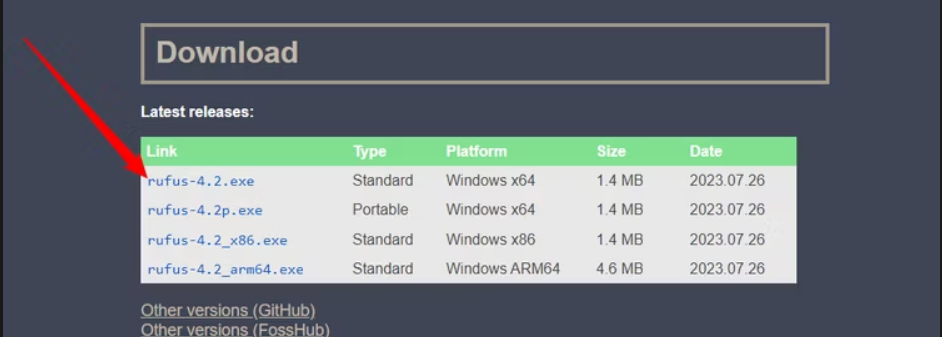
- Rufus – Rufus is a utility that helps format and create bootable USB flash drives from ISO images of Windows, Linux, UEFI, etc. It is useful for cases where you need to install a system without an OS.
“Creating a bootable pen drive is a straightforward process that enables you to run operating systems or utilities directly from the pen drive. Below is a step-by-step guide along with explanations in simple terms, accompanied by a website link for each step to further assist you”
Step 1: Choose Your Operating System:
Firstly, decide which operating system you want to make bootable on your pen drive. Popular choices include Windows, Linux distributions like Ubuntu, or utility tools like Hiren’s Boot CD.
Website link : https://www.microsoft.com/en-us/software-download/windows10

Step 2: Download the ISO Image:
Once you’ve chosen your operating system, you’ll need to download the corresponding ISO image. This file contains all the necessary data for the operating system or utility.
Step 3: Select a Bootable USB Creation Tool:
Next, choose a software tool that can create a bootable USB drive. Rufus and UNetbootin are popular and user-friendly options for this purpose .
Website link: ( https://rufus.ie/en/)

Step 4: Prepare Your Pen Drive:
Insert your pen drive into an available USB port on your computer. Ensure there’s no important data on it, as the process will erase everything.
Step 5: Run the Bootable USB Creation Tool:
Launch the bootable USB creation tool you downloaded. You may need to install it or run it directly from the downloaded executable file.

Step 6: Select Your Pen Drive:
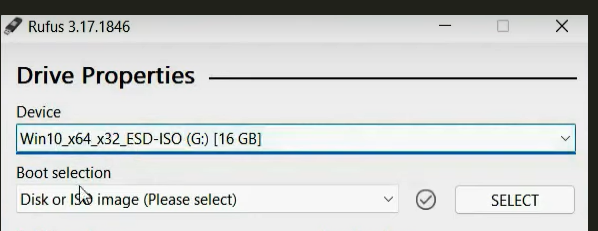
In the bootable USB creation tool, select your pen drive from the list of available devices. Double-check to ensure you’ve chosen the correct drive.

Step 7: Choose the ISO Image:
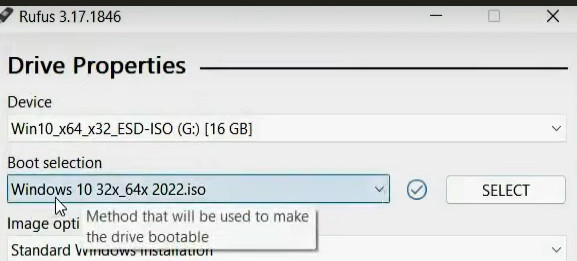
Locate the option within the tool to select the ISO image you downloaded earlier. Navigate to the location where the ISO file is stored and select it.
Step 8: Configure Settings (if applicable)
Depending on the tool you’re using, there may be additional settings to configure, such as partition scheme and file system. Unless you have specific requirements, the default settings usually work fine.

Step 9: Start the Process
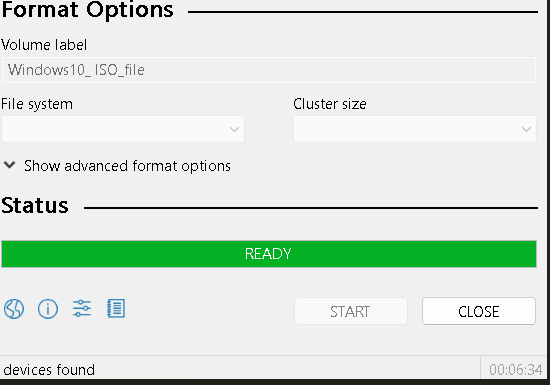
Once you’ve selected the pen drive and the ISO image, initiate the process to create the bootable USB drive within the tool. This process involves copying the contents of the ISO image to the pen drive and configuring it to be bootable.
Step 10: Wait for Completion:
The tool will now copy the contents of the ISO image to your pen drive and make it bootable. This process may take some time, depending on the size of the ISO file and the speed of your pen drive.
Step 11: Verify Completion:
Once the process is complete, the tool will usually display a confirmation message. Make sure to verify that the bootable USB drive has been created successfully
Step 12: Test Your Bootable Pen Drive:
Before using the bootable pen drive, restart your computer and configure it to boot from the USB drive. If everything is set up correctly, you should see the operating system or utility you installed on the USB drive booting up.
“ By following these steps, you can create a bootable pen drive and use it to install operating systems or run utilities on different computers. Remember to double-check each step and ensure that you’ve selected the correct options before proceeding.
FAQ's
- Insert a USB flash drive into a running computer.
- Open a Command Prompt window as an administrator.
- Type diskpart .
- In the new command line window that opens, to determine the USB flash drive number or drive letter, at the command prompt, type list disk , and then click ENTER.
To create a Windows 10 bootable USB, download the Media Creation Tool. Then run the tool and select Create installation for another PC. Finally, select USB flash drive and wait for the installer to finish. Connect a USB to your Windows 10 PC.
- Download and open Rufus. Insert a USB drive and select it from the list. Choose Disk or ISO image.
- Go to Select > choose the ISO image > Standard Windows installation > Start.
- Wait for the status to say “Ready,” then close Rufus and remove the USB drive.
- Open your Rufus application.
- Select the Disc Icon.
- Select the ISO from its location.
- Select “Start”. This will take between 5 to 10 minutes. After it is complete you can use this USB as a bootable CentOS installer.
Yes, you can use a USB drive as a boot device. This is commonly done when installing or repairing an operating system.